Home______________________________________________________________________
Installer Note:
The FBSD sysinstall application is very old and outdated. There has been talk for many years of changing it. There has even been some projects started to address this problem to streamline it and make it more easier to understand what is happening and why. There is no documentation with the sysinstall application that describes the different configuration options as to what the option means, what the valid values are for the option, or why one would select the option. These options only make sense to experienced users who already know the internals of FBSD. New users to FBSD or users who do not know how IP addressing works find the configuration options meaningless.The boot from the FBSD install CDROM executes the sysinstall application. It’s the mandatory vehicle required to initially install FBSD to your hard drive.
This section presents you with the minimum responses to the sysinstall application install prompts necessary to install FBSD on your hard drive. In most cases the response is ‘no’. You will learn how to manually configure a FBSD server outside of the sysinstall application option prompts. This way the next time you use the sysinstall application you will understand what it is asking for and how to respond.
Put the FBSD install CD in to the CD reader device. Power on the PC.
The PC boots from the CD and you will first see some stuff scroll across the screen and then display the FreeBSD boot option screen with the FreeBSD trademark figure on the right. There is a 10 second count down after which the default option is taken.
Hit [Enter] to boot immediately using the default.
You will see this boot option screen every time you boot FBSD. The normal response is to press the enter key or just let the 10 second timer expire and the normal boot process will continue. More stuff will scroll across the screen.
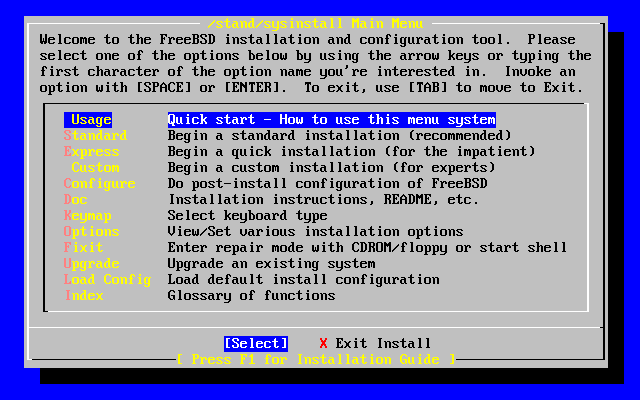
Then the sysinstall main menu will then be displayed.
Use the down arrow to highlight the Standard installation and press enter.
A message will display telling you the next step is to create the FBSD slice on your hard drive.
Press enter to continue.
The FBSD FDISK partition editor will display the a screen similar to this.
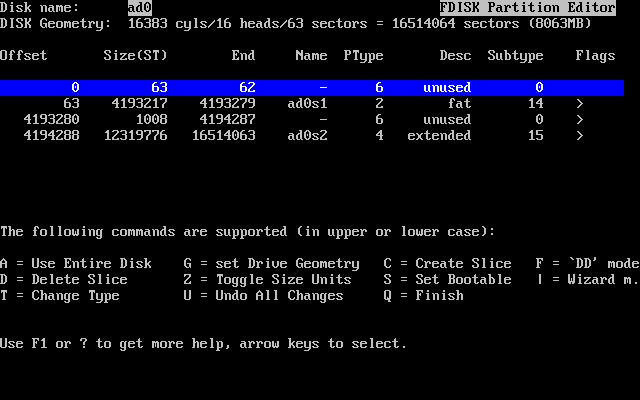
The FBSD FDISK partition editor is used to manage the space on hard disk drives by deleting old allocations and allocating new allocations. In the above screen shot of the FBSD FDISK partition editor screen, you see under the column heading Desc the word ‘fat’ for the second line, which tells you that the hard drive you are trying to install on has a MS/Windows partition, followed by unused free space. Since you have already been told in this Guide that the hard drive to be used has to be empty or contain data you don’t care about, you are going to delete all the existing allocations as the first step.
Use the down arrow key to position the blue highlight bar down one line so it covers the line that has the word ‘fat’ under the Desc column. Press the D keyboard key to delete the allocation
You should see just one single line marked as unused under the Desc column. If you have more than one used allocation, repeat deleting until there is only a single line displayed with unused under the Desc heading.
You are now going to allocate the whole hard drive to the FBSD system.
Press the keyboard ‘A’ key
Then the keyboard ‘Q’ key
to quite out of this screen.
You will then be asked if you want to install the FBSD boot manager. Use the down arrow key to highlight the ‘Install the standard MBR (no FBSD boot manager)’ line and then press enter to continue.
An informational message will display saying you are now going to create FBSD partitions inside the FBSD allocation space you just created. Press enter to continue.
The FBSD Disklabel program will be launched and display a screen which looks like this.
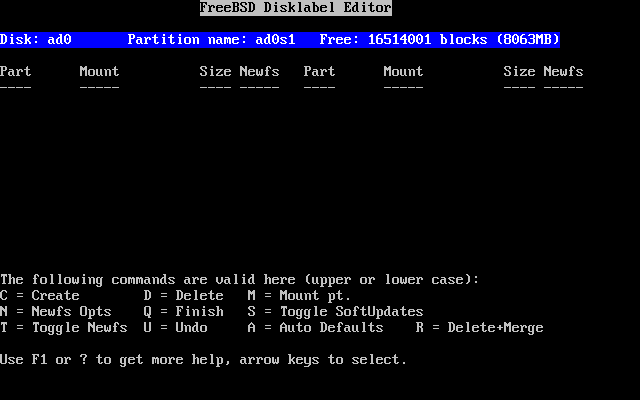
Disklabel can automatically create partitions for you and assign them default sizes.
Press the ‘A’ keyboard key
to allocate the auto defaults. These values are designed to service the needs of the general user and is what you are going to use. Selecting the auto default will display a screen similar to this. Yours will not match this display and that’s ok.
Sysinstall Disklabel Editor With Auto Defaults
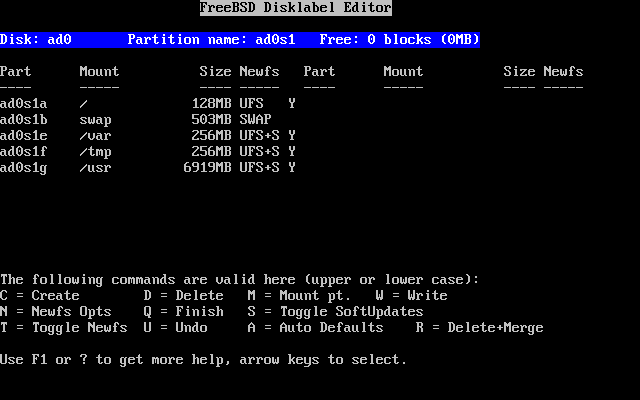
Now Press the ‘Q’ keyboard key
to exit the Disklabel program and accept the defaults.
The next step is to choose the distribution set you want to install.
Choose Distributions
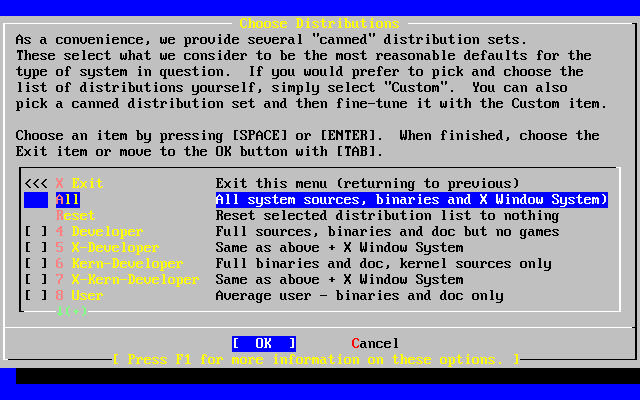
Use the arrow key to move the blue highlight bar down to
[ ] 6 Kern-Developer Full binaries and doc, kernel source only
You are installing a FBSD server and have no need for X-Windows. You are not going to be developing any new FBSD program code, but you do need the Kernel program source so you can re-compile the kernel to add options you may need for your server.
Press enter to select.
A window pops up asking if you want to install the ports collection. Use tab key to
highlight ‘NO’ and press enter.
You return to the Choose Distributions window. Use tab key to highlight the ‘OK’ button and press enter
The Choose Installation Media screen displays. The option number 1 (Install from CDROM) is highlighted. If you have more than one CD or CD/RW drive you will see a window asking to select the CDROM drive to install from.
Press enter to select
The User Confirmation Requested screen displays. Up to this point you have not made any changes to the hard drive yet. This is your last chance to abort the install.
YES is highlighted; press enter and your hard drive gets configured as you previous specified and FBSD Distribution you selected get installed on the hard drive.
A bunch of windows pop up showing you the progress of the install as data is copied from the install CDROM to your hard drive. There are no user prompts to answer during this phase of the install, so just set back and watch it happen.
At the completion of the population of your hard drive a MESSAGE screen displays saying Congratulations FBSD is installed on your system. Just press enter.
Now starts a bunch of question windows asking you if you want to configure some function options. You are to answer NO to these prompts.
Would you like to configure any Ethernet or SLIP/PPP devices? = NO
Do you want this machine to function as a network gateway? = No
Do you want to configure inetd and the network services that it provides? = NO
Do you want to have anonymous FTP access to this machine? = NO
Do you want to configure this machine as a NFS server? = NO
Do you want to configure this machine as a NFS client? = NO
Do you want to select a default security profile for this host = NO
An informational message window displays about "medium" security, press enter
Would you like to customize your system console settings? = NO
Would you like to set this machine's time zone now? = NO
Would you like to enable Linux binary compatibility? = NO
Does this system have a non-USB mouse attached to it? A NO answer will bypass the followings instructions a through h below. You really do want to configure the mouse so the mouse daemon will automatically start at boot time because you want the mouse copy and paste feature activated. An answer of YES means you have a serial mouse, you will be prompted with the following configuration windows,
a. Use the arrow key to move the blue highlight bar to option number 3 select Mouse protocol type
b. New window pops up with highlight bar on option number 1(Auto), Press enter.
c. You return to the configure your mouse menu, this time select option number 4 (Select mouse port) press enter.
d. New window pops up with highlight bar on option number 1(PS/2), Press enter.
e. You return to the configure your mouse menu, this time select option number 2 (Enable) press enter
f. A new window pops up with mouse pointer showing. Move mouse to see the pointer move.
g. If the mouse arrow pointer moves, press enter.
h. You return to the configure your mouse menu, this time select exit and press enter.
The FreeBSD package collection is a collection of thousands of ready-to-run applications, from text editors to games to WEB servers and more. Would you like to browse the collection now? = NO
Would you like to add any initial user accounts to the system? Adding at least one account for yourself at this stage is suggested since working as the "root" user is dangerous (it is easy to do things which adversely affect the entire system). = NO
Now you must set the system manager's password.
This is the password you'll use to log in as "root".
Press enter
Changing local password for root.
New password :
Retype new password :
Enter your secret password and press enter, You will be prompted to enter your secret password a second time. You must remember this password as it is needed to gain access to the Master account root. WRITE IT DOWN SOME WHERE YOU CAN FIND IT WHEN YOU NEED IT LATER.
Visit the general configuration menu for a chance to set any last options? = NO
You return to the Main Installation Menu. Use the tab key to highlight EXIT, press enter
Are you sure you wish to exit? The system will reboot (be sure to remove any floppies from the drives). Use tab key to highlight YES, press enter.
FBSD is now installed on your hard drive and will automatically reboot your system.
Be sure to remove the FBSD install CDROM or you will enter the install again.
On the first boot of your FBSD system after installing from CDROM, you have to return to the BIOS's setup configuration menu and change the boot sequence=CDROM to boot sequence=C this tells the PC to boot from the hard drive instead of the CDROM drive.
You now have the base installed for your FBSD server.
______________________________________________________________________
This FreeBSD Installer Guide is an public domain HOW-TO. This content may be reproduced, in any form or by any means, and used by all without permission in writing from the author.